Showing posts with label nails. Show all posts

Monday, 6 January 2014

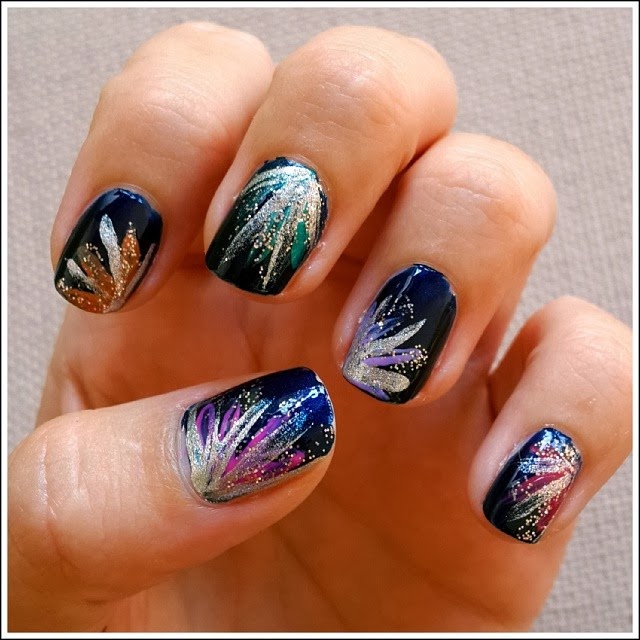
Art Class Nailed


For new years I obviously wanted to paint my nails accordingly. But everything seemed done and somewhat bleh!
So I whipped out the old art books and drew inspiration from the masters. (How silly that I'd never thought to look to artists for artistic inspiration. In retrospect it seems like the most obvious direction and source of ideas)

Post-impressionism is an era of art that really appeals to me. Let me first be honest, I am no art curator. I'll definitely confuse Monet and Manet and couldn't name their works, but I am able to appreciate beautiful art. 


So, post-impressionism, often characterised by thick energetic brush strokes and bold colours is, for me, most often, a visual feast. It does not clearly depict the image but often allows the viewers to create their own impression.

Drawing from this I created my post-impressionism inspired firework nails. 


These were somewhat time consuming, especially as I only had one paint brush, but based on their thick strokes, were relatively easy to execute.

Unfortunately I didn't take step by step pics, but start with a deep dark blue base colour (I used essie midnight cami), then once dry, apply the colour strokes to each nail, then after that the silver strokes over and in between the colours , then the glitter layer and finally a thick top coat to seal in all your hard work. 

But why not rather let your inner artist out and do it whichever way feels right to you :o)


Monday, 9 December 2013

It's beginning to look a lot like christmas...


Christmas is all around, so obviously my nails would follow suit and get dressed up for the season...

Monday, 4 November 2013

Halloween kisses


Halloween, although big in the states, is hardly a big deal in South Africa.

However, pretty much everyone I know loves to dress up, so Halloween gets her fair share of celebrating, despite that fact that you won't see pumpkins or skeletons decorating any lawns. It's actually mainly the dressing up that we partake in, and that's about it. (Some kids trick or treat but they have to visit quite a few houses as many folk forget to buy sweets as the shops here don't make a fuss over halloween candy)

This year we headed to a friend's beach cottage down in Umzumbe for a  little shindig. I didn't take too many pics, but I did instagram a few...

I baked a batch of angry spider cupcakes

we may not have pumpkins but we do have oranges...


Day of the dead, pocahontas and a hobo
 
ghostly decor


The Boyfriend and I

and of course I had to make my nails halloween appropriate


Thursday, 1 August 2013

Kisses...

waking up in winter is always difficult, but it's also always worth it.
Life has kept me pretty busy lately,and unfortunately my blogging had to take a quick break. To make up for my quiet, heres a few pics of what I've been up to lately...

Also, I am now on instagram and updating that regularly, so follow me @tipsytart for more pics and fun from my day to day adventures...


Behind the scenes on our latest shoot. Working in the advertising industry sure does have its perks, like planning and shooting for the upcoming spring season... definitely my favourite part of the job.

Just some of my mani's lately..


We may be in the middle of winter, but the weather has been so warm lately that beach days and sundowners are still on the agenda.
 

My sister came up from Cape town recently so we squeezed in lots of family time. Chilling with my siblings is always good fun...

Bijoux my little baby. Because I now live in an apartment I can't have any pets, but recently I was feeling horribly ill so went home (nothing's quite as good and Doctor Dad and Nurse Mum) and had this little treasure
spend all day cuddled in bed with me...


Sorry I've been so quiet.. kisses!

Monday, 10 June 2013

Pink - it was love at first sight...


There’s nothing like a little overdose of pink in this cold winter weather, and a promise of good things from the always optimistic and super girly Magic 8 Ball, to make everything good!


Friday, 3 May 2013

Photo-a-day: 'This is really good'

As I mentioned earlier today, I am going to try and keep up with this challenge and update with pics every day. Today's topic is 'This is Really Good', which is an easy one.. Champagne darlings!


A really good friend of mine (who also happens to be a total bar and liquor guru - check out his blog, Drink Movement, for some wonderful cocktails and bar knowledge) advised that a wise idea is to always keep a bottle of bubbly chilling in the fridge, and although I don't live up to this all the time (because you know, sometimes the champers gets consumed) I do love this concept and try to keep up with it...

This was a tasty glass of Billecart-Salmon, enjoyed sitting on our balcony at home, watching the afternoon slip into evening...

Sunday, 30 December 2012

Antlers and Antidotes


Megs is South African born, but now making her way in London and documenting all the lovely and quirky things she comes across... 

Make sure to stop by her blog for her stylish, somewhat vintage-feel fashion, her beautiful photography (she has an eye for beauty hidden all around us) and for a taste of what this honest and unpretentious beauty gets up to...

Who is Megan?

This is Megan...


I was lucky enough to have Megs be my Secret Santa and was spoiled with 2 divine nail polishes and 3 (yes THREE) gorgeous rings...   

I love them so much and I couldn't have got a more suited pressie. If there are a few items in the world I never seem to have enough of it is nail polishes, rings and shoes... I just increased my collection of two of my obsessions...


Tuesday, 20 November 2012

Magic in the Monarch


Do you believe in Magic?

I do and I love that I can’t understand it and am happy to accept it as magic. This of course is completely opposite to The Boyfriend who knows that there is definitely a logical explanation for every trick and that magic is just clever sleight of hand. Whatever. It’s magic. Embrace it.

We were watching Dynamo last night and that was what got us chatting about it. I am awe struck with his tricks. Seriously. They are fun and beautiful and take me back to the days of believing knowing anything is possible and everything can be real (including the fairies). In his one trick, Dynamo manages to turn a paper butterfly into a real Monarch butterfly and then a swarm of them fly about the room. Awesome. (link below)

Watching this inspired my latest mani… Ombre nails with an accent nail of a monarch butterfly wing…

These nails were easy enough but did take  a very steady hand and will need a bit more practice from my side.
First I did an ombre of orange and red using the sponging method  (see here how I did my ombrenails last time)
I chose to do just one accent nail wing, mainly because it is pretty tricky and I couldn’t bear trying to do my entire right hand and also because it feels like it may take away from the beauty of one winged nail.

To do the wing, draw a black curve on both ends of your nail, then painting from the top curve to the tip of your nail. Then join the two lines with three thin black strips, round them off slightly and finally add a few white dots to the black tips.


 p.s. If you know how Dynamo does his tricks don't dare tell me! I love believing in magic...

Wednesday, 24 October 2012

Floral Fetish Nailed


Am I taking my floral fetish too far? Dresses, skirts, in my hair and now on my nails too! But personally, if I may say so myself, I am in love with this mani! It reminds me of Cath Kidston designs and having Cath Kidston nails makes me happy.

These nails weren’t too hard to do, but they do take patience and time, but it is so worth it!

What you need:
  • A base colour (I chose a soft blue - Mavala Lagoon) but you could even use a creamy beige.
  • Your flower base  (I used a bright pink – Essie Lovie Dovie )
  • Your flower detailing ( I used a darker pink  - Mavala La Paz)
  • Green for the leaves ( I used a woollies olive-y type green)
  • Top coat and base coat (as always)


After applying your base coat, apply your base colour. I apply two coats so that it is fully opaque.


Once the base colour is dry, create the base of the flowers. These are not meant to be perfect circles so no need for other tools, the little brush in the nail polish is perfect. Just dab onto your nails creating messy little spots.


Once these are dry, using a toothpick dipped into your darker colour draw little squiggles on your roses. These create the petals and define the rose. I sort of outlined areas of the rose and brought them in making a 'c' shape of sorts. Play around and see what looks best on your nail and your lighter pink spot.


Lastly, you need to add the leaves. Do not leave (hehe) these off. They really bring the final look together. Two little green triangular-ish shapes complete your little rose.

As you go from step to step the flowers won’t really look good. You may think it is looking messy but once every step is complete they really come together to look gorgeous. Up until I had completed the last leaf The Boyfriend was not entirely convinced either, but as a final picture you’ll see the effort is so worth it.


Helpful Hint: I read that sometimes it is easier to try do the splodges on your left hand using an earbud as it is easier to control. I however managed with the nail polish brush so didn’t use them, but if you’re struggling keep one close for just in case…